Showing posts with label kids crafts. Show all posts

Thursday, December 20, 2012

Birthday Plate

We didn't have a birthday plate so before JJ got on the school bus I had the two boys drawing on a plate to make a special birthday plate.  

You use permanent markers and bake it in the oven at 350 for 30-40 minutes to set the ink.  And it's hand wash only.  After I had baked it and was washing it I noticed the orange was running, so I quickly dried it and bake it again and for longer and then I turned off the oven and just let it sit in there.  I also wonder if part of it was that it was Bic permanent markers and not Sharpies.  The colored Sharpies the activity day girls used were bought with the budget  money so I had left them there at the church in the closet.   And I only had red and green Sharpies and the rest Bic, because they are cheaper and I tend to be pretty frugal.

Thursday, October 18, 2012

Crazy Hair Day

When we found out JJ was going to have crazy hair day we talked about coloring his hair and he was super excited about it!!!  I had read on Pinterest about getting sidewalk chalk wet and using that color hair.  JJ wanted red, blue and green.  I got the red in and as I was doing the blue I let him look at it.  He got really upset and wanted it washed out!  He did not like it and started crying.  There was no convincing him.  So before we washed it out I asked him to let me take a picture.
 However, Tanner let me put the blue-ish color in his hair and he loved it!  He even went to school with it in and asked for me to do it again the next day, but I told him had to wait until Halloween.
What a cutie!

Thursday, January 27, 2011

JJ's Preschool B-Day Treats

Jayden was so excited to bring treats to preschool for his birthday and to be the special helper for the day.  It had snowed the night before, but luckily the schools just had a 2 hour delay.  Since JJ goes to preschool in the afternoon, they still had school.
I made some individual dirt cake cups for him to take to school.
Here's the recipe…

Dirt Cake
1 (8 oz.) Cool Whip
2 small boxes chocolate instant pudding
1 (8 oz. pkg.) cream cheese, softened
1 pkg. (1lb.) oreos
Gummy Worms

Beat cream cheese until smooth.  Make pudding according to package directions.  Add cool whip and beaten cream cheese.
Crush Oreos (leave icing in cookie).  Use a flower pot (lined with foil or saran wrap) or any container.
  Put layer of crushed Oreos on bottom, add layer of pudding.
Repeat layers, ending with crushed Oreos on top.
Put gummy worms in-between layers if you choose.  Also put some on top of dirt and some half in it with the heads sticking out.
Put a construction paper flower attached to the end of a straw or a plastic spoon and place in the dirt cake.  Or you could put in some cleaned fake flowers and serve with a small garden tool.


Thursday, December 23, 2010

Christmas Card for Kids to Color

I wanted a card that Jayden could color for his teachers.  But in my quick search I couldn't find one.  So I quickly put these 3 together.  They say the same thing inside, but there are 3 different pictures.  I believe you should be able to right click on it and save it to your computer and print it.  If not, and you'd like one, send me your email address and I will email it to you.
These are cards to be folded in quarters, not half.  I did it that way because they fit inside of an invitation envelope nicely and I have those envelopes.


I'm also partial to the Nativity scene being on the Christmas card and those are most definitely hard to find.  Not that I don't like Santa's and snowmen, it's just... Jesus is the reason for the season.  However next year when Jayden is in public school I will make one with Santa or snowmen just not to offend anyone, but I will still write "Merry Christmas" and not "Happy Holidays."

Monday, December 20, 2010

Nativity Craft

In nursery the kids made this cute little Nativity craft.  (FYI- my mother in-law is the nursery leader and 2 of her grandkids are in her class, Tanner and Carolynn.)
This is what Tanner made and he just loves it!  He told me all about it and who the people were.  Then I hung it up and every time he'd see it he would tell  me he made it for me and all about the people in the picture.  And as I am writing this post he saw the picture and said "I made that for you momma!"

 Here is the back.  I'm sure granny wrote his actual name, but Tanner wrote the circle or the "o" as he calls it and the "T".  That's how he writes his name if you ask him to write it.  So far those are the only letters he can write and I don't even know who taught him how to write them.

Thursday, December 16, 2010

Christmas Ornaments

Here are 2 ornaments I made this year.
 I used our family picture from our Christmas card last year, I just love the picture.
 And I had Carolynn (my niece that I baby sit a couple days a week) dress up as Mary and gave her Jayden's baby doll to hold for baby Jesus.  And then I made this ornament for her.
Here are the pictures I printed for the ornaments...
 I created the background with some clip art of weathered wood, to try and make it look like the back of the stable.  And cut around the people and put it on top of the background I made.  I made the pictures 2.5"x3".
I spray painted Popsicle sticks that I cut in half to form the stable.  I think it would be neat if you turned the sticks the other direction to make if more 3D looking, but I was too lazy to paint the other side of the sticks.  I had the little wooden stars from another craft I did a few years ago.  And so I just painted them.  You could use foam and cut stars or whatever your little heart desires.
I printed the pictures on card stock, just to give it more stability.  And then I used spray adhesive to glue them to a cereal box, again just to  make it more sturdy.  Also if you do print them on regular paper, sometimes the spray adhesive goes through the paper and ruins the picture, but it doesn't go through card stock.  Then I mod podged over them twice, letting each coat dry for at least 20 minutes.  I did this because I printed it myself, the ink would smudge when glue touched it (when I attached the sticks) and it will help the picture to last longer.
I used regular Elmer's glue to attach the sticks.  I hot glued the star on and I put a piece of hemp underneath the star to hang it and to have a little extra hanging down.
I think they turned out pretty cute.  What do you think?

Monday, December 13, 2010

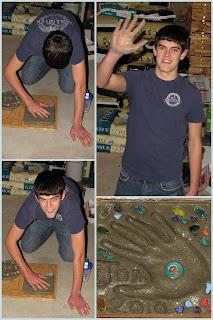
Stepping Stones For Granny

Polly had a great idea to make these hand print stepping stones for Granny and Pappy for Christmas.  They have such a beautiful flower bed around their entire house.  So we each bought a kit for our kids and for the grandchildren that don't live around here (Calvin, Caelin and Chase).  We got together at Polly's house to make them.  And Andrew visited Matt and brought back Calvin's.  Becky and Ralph went to visit Scott and his family for Christmas so they took the kits down with them to get their stone made.  The rest of us gave them a small album with these pictures and big box with all the stones in them on Christmas Eve.  (I'm posting this later, but I'm going to change the date to the date we got together at Polly's house.)
Dave mixed most of the stuff for all the stones.

Jayden

Tanner

Trevor

Austin

Carolynn

Corban

Damean

Finn

Josh

Rhett
I think they all turned out great!  Such a cute idea!

Tuesday, October 26, 2010

Spider Pops

I saw these cute spider pops on familyfun.com and thought we'd make them for JJ's preschool class.  Jayden just loved them!


It went along nicely with Jayden's costume, since he was spider man.
Related Posts Plugin for WordPress, Blogger...