Showing posts with label baby shoes. Show all posts

Saturday, January 5, 2013

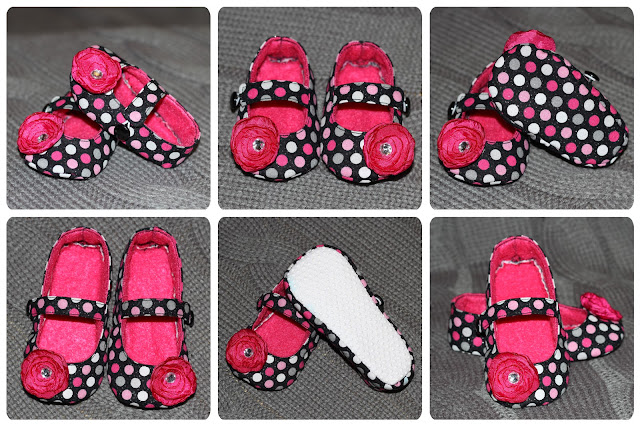
Baby Girl Shoes - Black and Pink

A friend of mine will be having a baby girl any day so I made a pair of shoes for her.  And I also made her a matching flower clip for her hair, but I didn't take a picture of the 2 together.
And I also made my niece, Cozette a pair for her 1st birthday.

The top pair are size 3 months with matching fabric on the bottom and the bottom pair are 12  month with grippy stuff on the bottom.

You can download the free pattern from Tao of Craft click here to go to their link.
I didn't use their strap piece.  I just used the piece that was left over from cutting out the shoe for the strap.  And I don't like velcro, it comes apart too easily.  I like to put an elastic loop in the end and then put that over a button.  It's harder to come off and it gives it a little stretch.  Really you don't have to un-do it to get the shoe on and off the baby's foot either.  You can check out my tutorial here from the pleated Mary Janes on how I do my strap.

I had original bought this fabric to make Mackenzie a dress and matching shoes, but then my mom had her stroke and I never got it done.  So I decided to use it for a friend and my niece.  Maybe I'll make a skirt or dress from it for Mackenzie someday.

Monday, October 8, 2012

Purple Leather Baby Shoes w/ a Bow

When our Joann's was moving I had bought some purple leather really cheap, in hopes to make some shoes or hair things for Mackenzie.    And I finally made her a pair of shoes.
And I added the bow.  The piece I used for the strap was the piece that was left over from the middle of the "u" when you cut out your top piece.  I just "squared" it up a bit, really it was a rectangle.  I did the elastic hoop on this shoe with the button.  This type of closure stays closed and still gives a little bit of stretch.  If you'd like to see how I do that you can check out my tutorial for the pleated Mary Jane shoe.
For this pair I also put a piece of quilt batting in between the two pieces for the sole of the shoe.  Since my daughter is 16 months old and walking I wanted a little more cushion in the sole.


Sunday, September 23, 2012

Brown Leather Shoes

I had bought this fake brown leather stuff really cheap when our Joann's was moving.  I needed a brown pair of shoes for Mackenzie for church and decided to make this pair.  They turned out really big.  They are too wide and too long.  And I thought I would try velcro this time and I decided I don't like the velcro closure.  I sort of like these shoes and I sort of don't.  I don't particular like the brown leather, it was cheap and that's the only reason I got it.  And they are so wide!  Maybe if I made them skinner I would like them better.  But they still aren't too bad.  I like to follow the pattern the first time and then make changes.
I'm really tempted to go back and make a new pair, skinner and with the loop and button closure because the velcro just doesn't stay closed.
 I forgot to change the white balance when I took the pictures of Mackenzie and on top of that she would not sit still for the pictures...
 I tired my best to fix the white balance, although it's better, it's still not great...


Click here to go to the website with the pattern and tutorial that I used the base of the shoe, it's called The Modern Baby Bootie by Tao of Craft.  I used the 12-18 month size shoe and the strap was the piece that was left over from the middle of the outside piece.  I just cut it into a straight rectangle and folded it in half.  I first sewed the the velcro to the side that would be on the bottom (I made sure my folded edge was facing down, because it looked nicer), then I folded it in half and sewed around it to give it a more finished edge.
I would recommend putting a layer of quilt batting in between the two sole pieces for the bigger sizes, it gives the sole more cushion for walkers.  I did not do it in this pair but I did it in a purple leather pair I will post later, when I catch up posting.  And to make it easier to attach the soles, if you have basting spray... glue them together with the basting spray.  But obviously if you want to make them so you can't see the seams then you can't do it that way.  However with the leather being thicker and the ruffle, I thought it would be too hard to make this pair so you couldn't see the seams.
Also, I took a pair of shoes she has (size 4) that were skinnier and traced that sole over the top of this sole pattern and cut it to the skinner sole.  For girls this pattern is just really wide.
If you would like to see my loop (with elastic) and button closure instead of the elastic you can see how I did it here in this pair of pleated Mary Jane's that I made.  I also have a tutorial for the pleated Mary Jane shoes there too.
For the leather "ruffle" I kind of guessed the size.  I measured the width that I wanted, held a ruler up to the shoe and decided how wide I wanted it.  Then I cut a long strip and folded/pleated it and then held it up to the shoe top to decide how long I wanted it.  Before you sew the heel together you want to sew the ruffle onto the shoe top.  At first I thought I didn't want the ruffle part to get stuck in when I sewed the sole of the shoe on.  But then it did it by accident on the one shoe and I kind of liked it, so I went back and had the other one get stuck in.  They are only stuck in on the insides in the front.  I wish now that I would have made it longer and had all 4 corners stick in when I sewed the sole of the shoe on.  Live and learn, right?
Sorry I didn't take any pictures explaining everything.  Maybe that will give me motivation to make another pair, skinner and what not.  So I can take pictures of the steps.  However, you should be able to understand the differences I made and follow the tutorial that I linked too above.
Happy sewing!
Saturday, September 8, 2012

Baby Boy Gift

My friend, Natalie, had her 5th baby!!!  And her 4th boy!!!  How exciting for her to have another sweet little baby!!!  I had wanted to make her some cute  boy shoes.  She is a big time PSU fan and I thought about maybe using PSU fabric or something along those lines.  But then I just decided to go with some stuff that I already had at home.  Then I saw this cute appliquéd tie on a onesie and I knew I just had to make that along with matching shoes!  And I couldn't decided if I wanted to go with "black" or "brown" so I did both.  I can't help myself, they are so cute!  And everyone needs a black and brown pair of shoes, right?
So here they are...
 I just LOVE them!!!  It almost makes me want to have another boy... almost!
You can find the pattern and a tutorial for the tie here... I drew my own tie, and I used Steam-a-lite 2, not the under wonder that she used.  They are the same thing, I just have Steam-a-Lite 2 from other projects I've done.
The "brown" shoes... really brown and green.  This is the same pattern for boys that I've made before with the wanes tooth fabric.   The pattern is the Taylor Shoe by Home Spun Threads.  Click Here to go there.  The pattern is free and they have an awesome tutorial on how to make them.  And they show you how to make the shoes without a seam showing in the inside of the shoe.

and the "black" shoe...

Cute, right?  Well I sure think so!
And after I had mailed this to Natalie, I was in Target and I saw a onesie on their self with a tie appliquéd to it, but I like mine better!  :)  After all, mine come with matching shoes!  :)

Saturday, April 14, 2012

Navy Blue Shoes

I love this navy blue pair of shoes I made for Mackenzie!!!!  I tried the elastic strap.  I think I like the strap with the button and the elastic loop better.  But I'm just trying new things.  I was thinking of using a snap and making changeable flowers to put on the shoe.  So I can have different colors of flowers, white, yellow, red, pink.  But I have since decided I like them just the way they are, now I wish I had pleated them.  But I didn't pleat them because I was going to put a flower on it... oh well... I still like them!!

This is how Mackenzie crawls on a slippery surface with her left leg out, I think it's so cute...
She is just so cute!!!!  I sure love this little girl of mine!!!!!

Monday, March 19, 2012

Thursday, March 8, 2012

Failed Photo Shoot Attempt

I made this "pettiskirt" for Mackenzie for her 9 month pictures. I found the pattern online and decided to make it instead of the no sew tu-tu I had originally planned on doing. They said to use nylon chiffon, it's softer and lays flatter and doesn't fray like regular chiffon does, apparently.  Well, you can only order it online and I didn't have time for that so I used Tulle.  And I'd have to say it is quiet puffy with the tulle!  I use just over 5 yards!  They say 3 is good enough but if you want it puffier use more.  I used all they had left on the bolt.  Wow, it took quiet some time to ruffle all of this tulle!!!!  But how cute is it?
Mackenzie was not so cooperative for me for the pictures and I was so bummed!  These were the only good ones...
When we went outside she just wanted to eat the leaves.  And boys she was so mad at me when I took them away!!!!


So I tried later when Daddy came home from work.  She normally smiles so good for daddy!  But she just wanted to take her head band off and her bracelet.


Uggh, it was a little frustrating so we just stopped. I just wanted a smile like she did in the morning before I put her in all this cuteness!!
I had also made cute little ballet slippers to go with the skirt, but you couldn't see them under all the fluff.

Sunday, February 26, 2012

Brown Baby Shoes with Colored Dots

I love this pair of shoes I made for my little Princess!!!
 However I think next time I will put the ribbon, going the direction of the bow and the bow going the direction of the ribbon.
 I used the pattern for the pleated Mary Jane baby shoes, but I didn't pleat them because of adding the ribbon and bow.  So I just used the pattern for the inside for the top piece as well.  Click here to go to the tutorial for the Pleated Mary Jane Baby Shoes.

I like the seam on the side of the shoe instead of the back of the shoe.  I like to cover that seam with the strap, see the picture above.  What do you think?  Do you like the strap to cover the seam on the side?  Or would you prefer the seam in the back and the strap tucked in, so you don't see it on the side of the shoe?
Oh and I believe I said this before... I can make them so you don't see the seam in the inside of the shoe, but it's just an extra step.  And you don't see it when it's on the baby's foot, so I don't bother doing it.

Saturday, February 25, 2012

Pink and White Ruffle Baby Shoes

I tried a ruffle pair of shoes... I think they turned out okay.  And I like the elastic strap I put on these too.

Sunday, February 19, 2012

Purple Pleated Mary Jane's

Mackenzie out grew all the other shoe's I made her.  My mom's doing better and so I don't go visit her as much as I used to.  I was going every other day, and that was a minimum of 3 hours out of my day, normally 4-5 hours, because it was an hour drive one way.  I just didn't have time to do any crafts, and could barely keep up with my house work.  So it sure felt good to sit down and sew something for my daughter again!  It's been since October when my mom had her stroke that I sat down and made a pair of shoes for Mackenzie, or anything really for my own child.  The things I made were for other people.
So here they are... I put the grippy stuff on the bottom this time.  She loves to feel the grippy stuff and it helps her when she's standing.  I think by the time she's walking she won't fit into these any more.  This is the fabric that I used for Polly's nursing cover.  I really like fabric that has lots of colors in it.
I can make shoes so you don't see the seams in them, but that's an extra step or 2 that I find isn't needed.  Really, the baby doesn't care that it's there and you don't see it when the baby's foot is in the shoe.
Related Posts Plugin for WordPress, Blogger...