Sunday, June 10, 2012

Giving Money As a Gift

My cousin graduated high school and is going into the Navy, so we just gave him money but this is how we did it...
I sort of combined 2 ideas that I found on Pinterest.  We taped $1 bills together and rolled them over a straw and put the straw in a red plastic cup (because it sort of blended in with the gumballs), put the cup inside a container of gum balls, used a lid from a big container of yogurt (and we just gave him the real lid so he could properly close the gumballs later) cut a slit in it to pull the money threw and we also put a piece of construction paper of the lid then a bow around it to also help hide the little bit of cup you could see at the top.  We wrote "don't blow it all in one place" on the top and "pull here" to the piece of construction paper that we attached to the money.
When my cousin took it out of the bag he said "oh, gumballs."  Then we told him to read it, he did and pulled it out and said "oh a dollar." Then he kept going and started to laugh.  We thought it was a cute and fun way to give money as a gift.

Friday, June 8, 2012

Mackenzie is 1!!!!!!!

My little princess is 1!!!!!!!!!!!!!!!!!  Wow!!!!!!! I can't believe it!!!!  I love this little girl so much!!!!!!!!!!!!


 I took pictures of her all day long just to get the perfect shot!  But the best ones were when Daddy came home and she smiled so big and cute for her daddy!!!!!  She sure loves her daddy!!!!


I think Mackenzie is so smart!  She's not walking yet and the boys were walking at 10 months, but it's okay.  She has time and she's my baby!
I remember when the boys first started standing in the crib they would scream for me to help them down, but not Mackenzie!  She knows how to fall on her bum and get down from standing.
If she stands at the end table and sees something on the other side that she wants, she gets down and crawls around to the other side to get it.
She knows that a hair brush is for combing her hair and tries to comb her hair with it.
When she sees my sandals on the floor she'll get one, bring it over and try to put it on my foot.
She can sign "more" and "please".  The other day when I asked her if she was all done eating she signed more please.  And when I give her more she smiles so big and is so proud of herself for communicating with me!  It's so cute!!!!
She loves to sit on the counter tops and loves baths!!!  All I have to do is walk in the bathroom with her and she starts laughing with delight!!!
The girl can kick!!!!  She's always had a strong kick!  When I lay her down to change her diaper she gets real mad and kicks real hard, it hurts if she gets you!  And if you pick her up and she doesn't want to be picked up she kicks really had and fast!!!
When I'm getting her dressed, if she's not mad that I'm dressing her, she'll switch hands if she's holding something so I can put her arm through the sleeve of her shirt.  I have never even told her to do it, she just does it!!
Of course there are so many more things she does that I just think are so smart and cute!!!!
She loves when we say prayers and she folds her arms and at the end when we say "amen" she throws her hands out and yells with a huge smile!!!!  I never even told her to fold her arms yet, one day she just did it!!!
She's very good at copy the things we do.  She'll give us her baby doll and we'll put it on our shoulder and pat it's back, give it back to her and then she'll put it on her shoulder and pat it's back.  Just so cute!!!
She blows kisses and waves.  If I tell her to say "good-bye" she'll blow a kiss.  She used to wave, but now she blows kisses.  And when we say "good night" and "I love you" she blows kisses!
When she's poopy and I change her diaper she waves her hand in front of her nose like saying "pee-you!" because that's what I do and now she does it.  So cute!
This girl just seems so smart to me for her age!!!  And she's so much fun!!!!!!!!!!!  I just adore and love her so much!!!!!!!!
Happy first birthday to my little princess!!!!!!!!!!!!!!!!!!!!

Wednesday, June 6, 2012

Teacher and Bus Driver Gifts

I found this idea on Pinterest but I modified it a little bit by covering the strawberries in Chocolate!  Yum!!!
This is what Tanner gave his preschool teachers and JJ gave his Kindergarten teacher and bus driver.

Here are the templates I made if you'd like to use them.  You should be able to just right click and save them.


Tuesday, June 5, 2012

Gifts For Kindergarten Classmates

I felt like I slacked off a little this year and didn't do as many gifts for the kids classmates for holidays and what not.  A friend posted on facebook about making some for her kids classmates and thought I'd quickly do some for Jayden's classmates.  This is what we made...

Here are the things to print on card stock if you'd like to use mine.  I have 6 per sheet of just a single one.  Right click and save to your computer, print and tape a smarty to it.  I also had my son sign the back of them.


Saturday, June 2, 2012

T-Shirt Makeover

Here is another t-shirt makeover I did.  I bought 2 t-shirts for $2.99 each, cut one in strips, I believe I did 1" wide and for the longer one I had to sew 2 together.  Ruffle them using your sewing machine, it's so easy!  Set your machine to the highest tension (mine is a 9) and the biggest stitch (mine is a 5) and run it through, do NOT back stitch.  It should just ruffle up as you go.  If not, when you're done, pull one of the threads to ruffle it by hand or to adjust the ruffles to the way you want them.  If the string you're pulling doesn't work, pull the other string.  Pin the ruffles to the shirt wherever you want them and sew them down with a medium stitch and auto tension, don't forget to change it back!  Also because you're working with knit make sure you are using a knit sewing needle (ball point) in your machine.  If your shirt doesn't stretch after sewing the ruffle on, use a bigger stitch.  I think I just used a 3 and it stretches just fine.  Next t-shirt I make over I'm going to cut my strips smaller, either 1/2 inch or 3/4 inch.  Oh and after it's sewn on I went back with a seam ripper and ripped out my ruffle stitch, it looked awful with it in.  So maybe you would want use a different color thread to ruffle it so it's easier to rip it out later, but I didn't think it was a problem for me.
I have plenty of the other shirt left over I want to make my baby girl a pair of shorts and leggins from it.


Wednesday, May 30, 2012

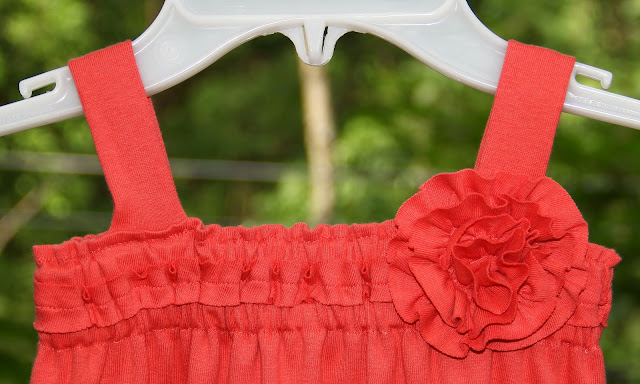
2 T-shirts Into a Shirt for Mom and Dress for Baby

I recently bought some cheap t-shirts for $2.99 each at a JC Penny Outlet near my house.  I have seen these t-shirt makeovers and have been waiting to find some cheap enough to try it.
So I made a shirt for myself and a dress for Mackenzie using 2 t-shirts.  I have some left over and was thinking of making some bloomers for the dress.
I also decided that I don't like the ruffles around the collar of my shirt.  I want to take them off and add another big flower above the smaller one on my shirt.
 I was too excited to get Mackenzie's dress done that I straps on before I put it on her and measured.  I should have waited, I want to move them in.  However, I did use a dress that I had to determine where they go, oh well!   Live and learn!
 She also wasn't her normally smiley self, but I didn't want to wait to take pictures.  Oh well, at least you can see what the dress looks like.


Remember I'm going to take the ruffle off the collar and add a big flower above the one that is there.

  I found the pattern for the dress on Pinterest and modified it a little.  Click here for the link to the pattern.
The t-shirt stuff is everywhere, so I won't bother repeating how to do it.
 

Friday, May 18, 2012

Award Ribbons

I'm on the preschool board and I volunteered to make the award ribbons for the graduating preschool class.  And here they are...
The teachers choose who gets what award, I just made them.

Monday, May 14, 2012

Bug Cupcakes

We made these cupcakes to take to Tanner's preschool for his birthday!  Aren't they so cute?  It's another idea I found on Pinterest.
And Jayden made these 4 for our family to eat...
Mackenzie loves to sit on the counter!!!  It's so funny how much she loves it! While I was whipping the icing she sat on the counter.


Birthday Boy Ribbons

I had seen the birthday boy ribbons that were in stores, they're really not that expensive but I thought I'd make my own anyway.  We were combining Tanner and Finns birthdays this year so I also made one for him to wear at the birthday party.  I think they turned out pretty cute...
I took some scrap fabric, cut a strip, like 5 inches wide or so and maybe 20 inches long.  I folded it in half, wrong sides together, sewed down close to the rough edges to hold it together.  Then I did a ruffle stitch to ruffle it.  It's so easy, all you do is set your sewing machine to the highest tension on mine it's a number 9 and the biggest stitch, on mine it's a 5.  And send it through, do NOT back stitch to start or stop. It should just ruffle as you sew!  Amazing!  But if you would like more or less of a ruffle, pull on one of the strings, you should just be able to see which one it is that you'll need to pull, if not... if the one you pull doesn't work, pull the other one.  While pulling the string you can adjust the ruffle.  Then put it in a circle shape, you made need to the cut if you think your circle is too big, but you will need to be very careful not to cut the ruffle stitch or your ruffles will come out!  It's not as complicated as it sounds.  Just cut the fabric without cutting the thread and using your seam ripper pull the threads out of the piece of fabric you're not using, but don't rip the threads.  Once you have it the way you want it, I tie a knot with my hands, just a basic knot, with the threads that were used to ruffle it, then snip the excess thread and sew your ends together and then zigzag the ends so it doesn't fray.
I hot glued it all together.
I hope all that makes sense.  But if you're a crafty person and know how to sew, you should really be able to figure it all out just by looking at the picture.

Saturday, May 5, 2012

Philly Temple Blocks

A few years ago I had come across some cute temple blocks on someone's blog and had wanted to do them with the young women because at the time I was in in young women's.  But we never did them.  So now that I am the Activity Days leader I decided to do them with the girls.  And now we know of the plans for a temple in Philadelphia and there is a picture of what it is supposed to look like.  So I took that picture, turned it black and white and added "I'm going there someday!" to it.  I had them printed at a 1 hour photo place and the girls mod podged them to the blocks and added ribbon.  Lora, the lady with me, and I sanded and spray painted the blocks ahead of time.  We use wood from the garage that we tore down at my house.
I forgot my camera on Wed. night so I don't have pictures of the ones that the girls made.  But we decided to do extra and give them to the girls that will be coming into Activity Days during the year.  So I took those home and finished them at home.  Unfortunately the pictures bubbled up.  I'm wondering if it was because we didn't have time to let the mod podge fully dry underneath the picture (you use the mod podge to glue the picture to the wood) before we mod podged over top.  And I had them next to the coal stove and they got really dry.  I don't know really know what happened, but I'm a little annoyed that it happened!
Anyhow, here are the 5 that I finished up at home, I just had to add the bows.  But I did do another coat of mod podge and it helped the bubbles a little, but not much.  You can see some of the bubbles in the picture.
I was going to upload the black and white picture of the Philly Temple for you to copy and use if you wanted to do this, but if you read a previous post, my computer died and that is where the picture was saved.  However, if you have any photo editing software, you can do it.  Download the picture from the church website, turn it black and white and add text.

Saturday, April 14, 2012

Navy Blue Shoes

I love this navy blue pair of shoes I made for Mackenzie!!!!  I tried the elastic strap.  I think I like the strap with the button and the elastic loop better.  But I'm just trying new things.  I was thinking of using a snap and making changeable flowers to put on the shoe.  So I can have different colors of flowers, white, yellow, red, pink.  But I have since decided I like them just the way they are, now I wish I had pleated them.  But I didn't pleat them because I was going to put a flower on it... oh well... I still like them!!

This is how Mackenzie crawls on a slippery surface with her left leg out, I think it's so cute...
She is just so cute!!!!  I sure love this little girl of mine!!!!!
Related Posts Plugin for WordPress, Blogger...