
Okay, here is my attempt at a tutorial, I hope you all can understand me.
I got the pattern from Shwin & Shwin You should also check out the rest of the site for more patterns. She has some cute baby clothes patterns I'm itching to make for my little one. However at 12 weeks old and with a 5 and 3 year old it's a little hard to spend a lot of time sewing.
(please note, because I have a lot of pictures I'm not going to make them large, if you want to see the picture larger just click on it and then use your browsers back button to go back to the blog.)
Supplies:
Fabric for the shoe (if you're making 1 pair 0-3 months I found that a fat quarter works great and should work for up to 12 months but don't quote me on it because I haven't made that size yet, I'm just guessing)
Felt for the inside or fabric if you choose
Interfacing, medium-heavy weight
Elastic Cord
2 Buttons
And the typical stuff... sewing machine, thread, scissors, etc.
Choose your fabric, I prefer 100% cotton fabric for the outside of the shoe. I use felt for the inside to help the shoe hold its shape. If you want to try to use fabric, put interfacing on the inside fabric as well.
Iron interfacing on the wrong side of the fabric you choose to use for the shoe. Follow the instructions on your interfacing to do this. I used medium-heavy weight interfacing and it worked great. (note- do NOT iron interfacing to the felt.)
Once you have your pattern (I linked to it at the top of this post) trace and cut out your pieces, don't forget to reverse the shoe top when tracing the second foot, so both shoes will have a seam in the inside. I use the blue "mark be gone" pen to trace my patterns. I love that pen! You just get it wet and the blue disappears. So if you see blue on the fabric in the pictures, that is why, it's from the "mark be gone" pen and I haven't bothered to erase the lines.
The white felt I had was one that had some glitter on it, I didn't want to run to the store to get regular stuff, so I used what I had. The fabric is left over stuff from the burp cloth I made with this fabric. Click here if you'd like to see the girl burp cloths I made for my little peanut. I ended up loving this fabric for the shoes so much, I went back and bought a little more. I'm going to try selling these shoes and more on esty, but I need to get some in different styles and fabric made first. However if you'd like some before I get the site set up please feel free to contact me through my blog by leaving a comment.
I took the picture of the pieces after I pleated mine, so I put the pattern of what it would look like if it was pleated in the picture.

Pleat the top of the shoe, I did 3 pleats but if you want to do more or less that is your choice. To pleat them line up the sides of the outside top (fabric) with the inside piece (felt) put the the top piece right side facing up so you can see what it will look like and fold down the pleats until it was how you like them. I used pins to hold them in place and when it was how I liked, I ironed them down. It has to be right side up to iron, do NOT iron the interfacing that is on the back of the fabric.
After you iron your pleats down, put your 2 pieces with the right sides together (so now the interfacing is facing up), I like to pin just to be sure they stay put, but you really don't have to pin them.

Sew them together on the inside of the "J" with the right sides of the fabric together. I trimmed my top fabric at this step, but you can trim it after you turn them out if you wish.
 |
| The one on the left is not trimmed and the one on the right is trimmed. |
Cut a "v" in the corners like in the picture below. This helps it to turn easier and look prettier.

Turn them right sides out and iron them down. Mark a 1/2" down from each end with a pin or a mark it with a little dot. See picture below.

Sew as close to the edge as you cam from mark to mark. I like to use a thread color that matches my fabric, but a contrasting one might look cute too.

Open up the ends of one shoe and bring them together. Put the fabric with the fabric and the felt with the felt, pin and sew.

Press the seam open with your fingers and fold it over so it is right side out. You can't iron unless you put a pressing cloth over top because the iron can't touch the interfacing or the felt. Using your fingers to press the seam open and holding it open as you fold over works really well. Once you fold it over then you can iron it down. You want to have the seam open instead of to one side so it lays nicer when it's turned right side out.

Once it's folded right side out, go back and connect the line. If you want to try sewing it all down at once at this point instead of sewing it earlier, go ahead and try it. I just find it easier to do it this way.

Ta-da, this is what you'll have...

Now to make the strap... You can do the strap several ways, you can use Velcro, put a button hole in it, or use elastic and a button like I do. I like it this way because I feel Velcro comes apart too easily and doesn't stay fastened. With the elastic loop it gives the strap a little stretch on the baby's foot.
When I cut the strap I draw the curve, but I cut it straight... that's just how I do it.
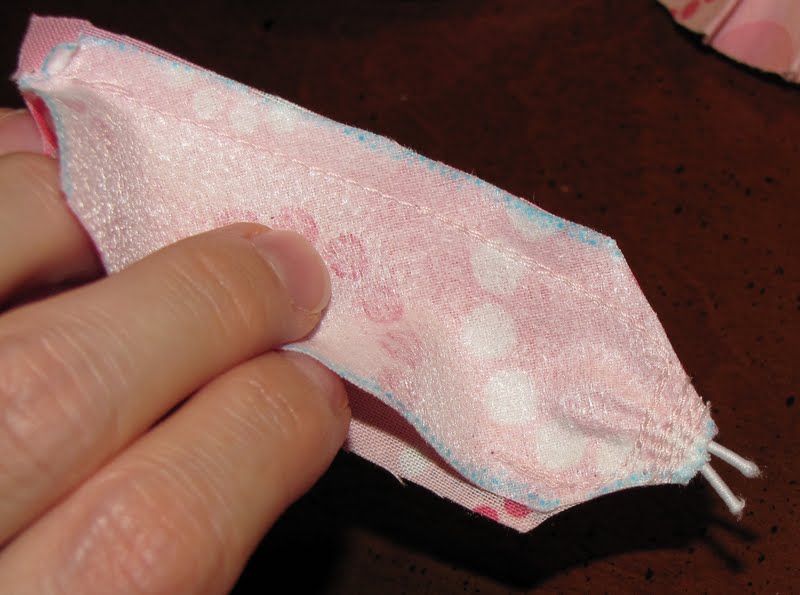
Put 2 pieces of the strap with the right sides facing. Cut a 2" piece of elastic cord, fold it in half and pin it in the middle with 1/4" of the ends sticking out (see picture below), so the loop is sandwiched in between the right sides of the fabric. I just think it's easier this way. If you want to cut it 1/2" shorter and don't leave any sticking out, you can do that too. Then I tack it down lots to be sure to it won't pull out. To tack it down, just sew back and forth over it. It's tacked down in the picture below but you can't really see it because the thread blends so well.
Put 2 pieces of the strap with the right sides facing. Cut a 2" piece of elastic cord, fold it in half and pin it in the middle with 1/4" of the ends sticking out (see picture below), so the loop is sandwiched in between the right sides of the fabric. I just think it's easier this way. If you want to cut it 1/2" shorter and don't leave any sticking out, you can do that too. Then I tack it down lots to be sure to it won't pull out. To tack it down, just sew back and forth over it. It's tacked down in the picture below but you can't really see it because the thread blends so well.

Sew it about 3/4's of the way around. I used a 1/4" seam allowance here. You could sew it all the way and try to flip it, but I've found that it's too skinny to do that and this way was easier. The reason I do it this way is to get the curve. It's much easier if you sew the curve this way then trying to fold it under. In the picture below I drew over where I sewed, the black line. The picture below that one is the same picture but without the black line.

Turn it right side out, fold in the edge that isn't sewn and iron it down. Then stitch around the whole strap as close to the edge as you can, this will sew down the spot that wasn't already sewn down. Plus I think it makes the strap a little more sturdy.

Attach the strap to the the outside of the shoe where the seam is. Align the strap where you'd like and sew it on. I like to use it to cover the seam.

I sew right along the lines where I previously sewed on the strap. I didn't sew across the strap at the top of the shoe, but I don't see why you couldn't. I started at the bottom of the shoe, when I got to the top of the shoe I back stitched, lifted the needle and presser foot, moved it to the other side, backed stitch again and sewed the other side. Then you go back and clip the little bit of thread on the top and bottom.
But I just thought, why not start at the top of the shoe, back stitch and sew down one side, sew across the bottom as close to the edge as you can, then sew up the top and back stitch. Either way you want to do it.

Sew along the whole bottom of the shoe attaching the top to the felt. Stay as close to the edge as you can. This just makes it easier to fasten it to the sole of the shoe.

Sew the top of the shoe to the sole. Turn the shoe top inside out. Place the sole of the outside (the fabric) face up and the inside sole underneath that (the felt) and pin it to the top of the shoe, see the picture below. Line the middle of the back of the heel up with the back of the shoe top and pin around from there.

The shoe should look inside out. Sew it, turn it over and make sure you caught all the fabric. If so you're done. If not, go back and sew it again, or rip out seams if you have to and do it again.
For a smoother look either trim V's where the curves are or trim it really close to the seam.

Turn it right side out and pull your strap over to see where you want to sew your button on, mark it and sew it on.
Ta-Da you have a cute pair of shoes!
If you want to make it so you don't see the seams I will show you how to do that when I post the tutorial on how to make the boy/unisex shoe. This way is a little faster.


This is perfect. I'll write up my feature about you as soon as I get a chance. Thanks so much.
ReplyDeleteHi thank you for the instructions. I'm new to sewing but I hope I can sew two pairs of these for my twins. By any chance do you have a video tutorial?
ReplyDeletePattern link is not working.
ReplyDelete