Thursday, February 28, 2013

Apron

I have been wanting to make myself an apron for well over 2 years.  And I finally sat down and did it!
I found a pattern called "Spice it Up Apron" by Pat Bravo.  Click here to get the free pattern.  It's 3 pages of a PDF.  If you know how to sew, it's very easy to follow.
I made the top part of mine 12 inches wide and the waist of the top ended up being 21 inches, I wanted 16 but it stretched out as I sewed it.  My chest area is where I need the coverage, that's where all the grease splatters when I'm cooking.  So I made it bigger.
Also, note they never tell you to fold in your edges of the bias tape you sew at the top.  And also the ends of your ruffle you sew on the skirt, in mine it's green.  I think I would have like to do the sash in the green, but oh well, it's still nice the way it is.
The big reason it took me so long was I always look at a pattern and see things I want to try and do differently, so I have to sit there and figure it out.  I'm a nut about that!  So I just sat down and followed the pattern, except making the top wider to cover more.
And I bought sliders for the strap around the neck, you have to order those online.  They are like 40 cents and shipping is really cheap.  I ordered mine at strapworks.com
I didn't want to tie it behind my neck and I wanted it adjustable but I didn't want D rings with an end hanging down.  The sliders work great!


Another note, if I make this pattern again... you ruffle the whole width for that 12 inches for the top piece... that's a lot fabric up there.  I don't think I think I really like all that fabric up top.  I may not ruffle so much next time, maybe even just put a few pleats in instead of ruffling it... just a thought.

Friday, February 15, 2013

Vanilla Almond Butter


I go through a lot of almond butter!  So tonight when I made some more I decided to try adding some stuff and roasting the almonds... mmmmmmm!!!!  It's so good!!!!!!  I LOVE it!!!!

Here's the recipe...

Vanilla Almond Butter

2 1/2 Cups  Raw Almonds
2 TBL coconut oil
1/4 tsp sea salt
1 TBL organic Vanilla extract
(if you want you can also add a TBL of cinnamon...yum!)
  1. Preheat oven to 300 degrees.  Spread almonds out on a baking sheet and bake for about 18 minutes, turning halfway through.
  2. Let the almonds cool for a few minutes when they are done baking.
  3. Then put everything in a food processor for about 20-30 minutes until it's the smooth constancy that you want.  You will have to stop and scrap down the sides during the process.
  4. Transfer to a glass jar or Tupperware container.  I store mine in the fridge, but I think it might be okay to store it at room temperature.

Note: make sure your vanilla extract does not have sugar or corn syrup added to it, that is why I use organic.  It cost more, a lot more, but there is NO sugar or corn syrup added to it and I think it has more flavor to it!

Another Note: I actually do 3-4 cups of almonds and keep the rest the same.  Add a Tablespoon of cinnamon if you want a cinnamon flavor... it's wonderful!!!   And sometimes, depending on the almonds, it takes awhile in the food processor.  Just be patient and it will get smooth.  Once your past the point where you have to keep stopping and scrapping down the edges you can let it go and walk away.  As long as the stuff is moving it will get there.  Sometimes a big ball forms and goes around for awhile before it turns into soft smooth almond butter.

Thursday, February 14, 2013

Valentine's Heart Butterfly Magnet Craft

Tanner loves making crafts and doing papers.  So today we made some butterflies with hearts.  I printed out the hearts in 3 different sizes and they colored them.  Tanner cut his out but I cut Kolin's and Mackenzie's out.  And I glued them together and put a magnet on the back.  Tanner and Mackenzie really like them.  They will take them off the fridge and play with it, then put it back on.  It's cute to see how proud they are of it!


You can totally just cut out different hearts in construction paper too!  And use pipe cleaners for antenna's as well.

Valentine's Day Plaque

I saw a cute card on Pinterest with a foot print and hand prints in the shape a heart and it said "From the bottom of my heart, to the tips of my toes, I love you!"  So I decided to make a plaque out of it and also do the feet in a heart shape.
Dave cut and spray painted some extra wood for me and I did the rest.  I did the kids feet and hand prints in the shape of hearts on card stock with washable poster ink and I printed the poem on card stock.  I also had Kolin and Tanner sign their names on card stock and I scanned it into the computer and put it at the bottom of their card.  I first had Tanner try to sign the card, but it must have intimated him because it was a small space.  So I just had him write it on the paper like I had Kolin do.  I actually had Kolin trace his name (he's only 3) and then I erased the pencil before scanning.

 Oh and of course I mod podged the pieces to the board and mod podged over the whole thing and the sides 3 times, letting it dry in between layers.

Mackenzie wouldn't let me do her hand prints.  The whole time I was painting her feet she was saying "ouch, ouch, ouch!" It was really funny!  And she did it again when I was washing her feet.  When I asked her if I could do her hands she said "no!" So I just stopped there.  And I turned hers the other direction and put a piece of Scrapbooking paper behind it.

 I didn't get a picture of Tanner's finished because he gave it to his Granny and she stopped by right after it had dried so I just let her take it then, well Tanner gave it to her then.
But I did take this picture of all 3 of them last night, before I mod podged the top and at this point I had only mod podged Kolin's papers down, not Mackenzie or Tanner's (I just placed them there for the picture.)  I had to go and buy more mod podge the following day.
I think they turned out pretty cute!!!  What do you think?

Wednesday, February 13, 2013

Heart Attack Kids Lunch Box

This year I decided to "heart attack" Jayden's lunch.  I cut out all these hearts and wrote messages on some of them.  Dave folded pieces of paper and taped them to a heart and his sandwich container and some snacks so the would pop out at him when he opened his bag.  After school I asked him how his lunch was and he said "it went poof all over!"  He said he liked it but put them all back so the other kids wouldn't say "no fair."


Saturday, February 2, 2013

Lego Coloring Book Party Favors

My son was having a small bowling birthday party with some friends from school.  He's really into Legos these days and I saw a pin on Pinterest with these cute Lego coloring books.  However you had to pay to download them.  I didn't want to do that, so I found some free images that you could download and created my own coloring books.  
I only need 10 but accidentally printed 20, I forgot there were 2 per page!  Oops!  That's what happens when I try to multitask.  So we gave some to cousins and other friends.
 You print the cover page on card stock, I used colored card stock.  And the inside pages I printed double sided.  Then you cut them in half, arrange your book and sew it down the middle!!!  How cool!!!!  You sew it!  So genius!  I love it!  I'm sure you could staple it, but I love that it's sewn!
 Now how easy is that?
We also bought each kid a little Lego figure and put them in a sandwich bag then I made that cute little topper to staple to the top of the bag.  It says "Thank you for building me up on my birthday!"  How cute, cuz you build with Lego's... get it?
Here's what they looked like all put together...
 Here is the jpeg if you want to right click and save this image.  I accidentally printed the first page too small, as you can see in the image above, 3 of them all smaller.  But I think it still looks fine.
Here is a close look at the inside of some of the pages.  I wanted that plain Lego to be last so the kids can create their own figure.


I think they are super cute and so I wanted to share them with everyone.  I don't know how to create them so you go to a website and download them, but you can right click and "save as" them.  Hopefully that works for you.  If anyone wants to tell me how to create them so you can download them in one click that would be great!  Please just leave a comment.
Here are the pages...


Saturday, January 26, 2013

Fine Motor Skills

Mackenzie loves to pour water back and forth from cup to cup.  If she wakes up early in the morning while I'm still drying my hair I'll bring her in the bathroom with me and she'll stand on a stool and just poor water back and forth between 2 cups.  Water is a bit messy so I decided to get some pom poms out for her to pour back and forth.  I got out  my little Tupperware play set and some plastic spoons and her and Tanner had a great time playing with them.  She already knows how to use a spoon but it's still great practice and it keeps her entertained for awhile.  It's also easy to clean up!

JJ & Year Pictures

Jayden James will be 7 in 2 days and since I had the back drop and lights set up for Devon I went ahead and did his 7 year pictures...


Friday, January 25, 2013

Devon

My Nephew is going a 2 year mission for our church to Finland, so exciting!!!  Polly wanted a few pictures before he left and these were my favorite...
 I wish I would have put the gray backdrop up for some of the pictures, since he has a white shirt on... oh well, live and learn.
 It had just started to snow outside, but you can hardly see it in the picture...

Saturday, January 12, 2013

Zucchini Chips

I tried making some Zucchini chips, I followed this recipe from Table for Two.
They bake at 225 for over 2 hours!

I have another recipe pinned where they don't bake for so long, I want to try that recipe next.  
I actually thought these were good and gobbled them up pretty quick!!!!

Saturday, January 5, 2013

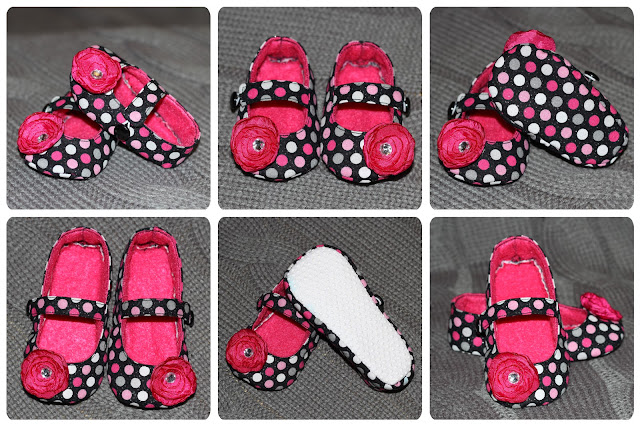
Baby Girl Shoes - Black and Pink

A friend of mine will be having a baby girl any day so I made a pair of shoes for her.  And I also made her a matching flower clip for her hair, but I didn't take a picture of the 2 together.
And I also made my niece, Cozette a pair for her 1st birthday.

The top pair are size 3 months with matching fabric on the bottom and the bottom pair are 12  month with grippy stuff on the bottom.

You can download the free pattern from Tao of Craft click here to go to their link.
I didn't use their strap piece.  I just used the piece that was left over from cutting out the shoe for the strap.  And I don't like velcro, it comes apart too easily.  I like to put an elastic loop in the end and then put that over a button.  It's harder to come off and it gives it a little stretch.  Really you don't have to un-do it to get the shoe on and off the baby's foot either.  You can check out my tutorial here from the pleated Mary Janes on how I do my strap.

I had original bought this fabric to make Mackenzie a dress and matching shoes, but then my mom had her stroke and I never got it done.  So I decided to use it for a friend and my niece.  Maybe I'll make a skirt or dress from it for Mackenzie someday.

Thursday, January 3, 2013

Almond Butter

I made some yummy Almond Butter!  This was my second batch.  It's so easy to do!!!!
All you do is just get some natural almonds and put them in a food processor for about 20-30 minutes.  That's it!  I do NOT add anything else, it's just the almonds.

My little food processor can only handle about 4 cups or 1 pound of almonds at a time.  During the process you will need to stop and scrap down the edges.  And it will get hot.  Let it go till it's about as smooth as you'd like it.  I store mine in the fridge.  I'm not sure if you have to, but I do it just to be safe.  And I love eating it with celery!  Yum!

I do not roast mine.  I actually did try some almond butter that was made with roasted almonds and I don't really care for it.  I like the natural almonds.  And it's so much healthier for you then peanut butter!


 And of course Mackenzie had to help me.  She loves being in the kitchen with me and doing what I'm doing!  She saw me scrap the bowl, so she had to do it too.  She's a cute little copy cat!

Sunday, December 30, 2012

Robinson Pictures

Before Katelynn went back out to Utah I went over and took some family pictures for Polly.  They are only missing Michael Taylor who is now married.
What a good looking family...


Related Posts Plugin for WordPress, Blogger...