Thursday, December 23, 2010

White Christmas Cookies

I finally started feeling better around week 14.  (I am 16 weeks now.)  Then I started getting terrible headaches that would last for about 3 days, go away for a couple days and then come back.  Then the weekend before Christmas I got what I thought was a head cold (and still think that is what it started as) and turned into a sinus infection.  And on top of that I had a terrible headache for 4 days.  Luckily I called my doctor and she gave me a prescription for the sinus infection so I could be better for Christmas.  But we need to wait for that to clear up before we can address these headaches.
And so I was in no mood or condition to bake Christmas cookies this year.  So Dave, being the super daddy that he is, bake 4 different kinds of cookies with the boys.  They made snicker doodles, chocolate crinkles, forgotten cookies and chocolate chip cookies with M&M's.  How awesome is he?
Finally on the eve of Christmas eve I felt well enough to make cookies with my boys.  And the only cookie I felt I could eat this year (that's the other thing, I have no desire to eat cookies or much of anything because it makes me nauseous) was my Mammy's (my dad's mother) White Christmas Cookies.  I looked forward to these cookies every year.  I remember after she passed away I gave it a try and my attempted failed.  And so I haven't tried since.  But I have learned a lot about cooking and baking since then.  I'm no expert, but I defiantly know more now then I did about 7 years ago.  From what I gather these are a real PA Dutch kind of cookie.  You cannot buy anything like these unless some old lady at a little church bizarre makes them.  And like I said, I grew up eating these every year.  And so for myself and my family (sisters, brothers and parents), we LOVE them!!!
And for those that don't understand how they couldn't have turned out the first time I made them, I will copy word for word what the recipe card I have says...
 White Christmas Cookies
 4 1/2 Cup flour
2 1/2 Cup sugar
1 Cup butter
1 tsp baking soda
1/2 tsp cream tartar
3 eggs
1/2 tsp salt
2 TBL milk

Chill dough - roll & cut
350 degrees 8-10 minutes
That's it, that's all the instruction I have.  When I first made these, I didn't cook or bake much, so... can you imagine what someone with little experience would do with instructions like that?  I'm not sure what I did, but I know they did not turn out well.
This time I mixed the dry ingredients together.  I used softened butter and creamed it with the sugar and then added the wet ingredients and then the dry ingredients.  And it seemed to turn out well.  A recipe I have for sugar cookies says to chill it for an hour, so that is what I did.
I was surprised to find out that the first batched that was rolled out and cut did not turn out as well as the next  batch, when I took the excess and rerolled it and cut out more.  The more it was mushed back together and rerolled the thinner I could roll it and it is the thinner cookies that tasted the most like my Mammy's cookies.
Anyway, the boys had so much fun cutting out the cookies and putting the colored sugar on them.  After they were done they loved to point out (especially Tanner) that they made those cookies.


Funny thing is I have aprons for them, and the aprons are hanging up right behind where they were working and I never thought to put them on the boys.  Oh well, maybe one of these times when they are helping with the food I will remember to put their aprons on.
I'm so glad these cookies turned out!  They were the only Christmas cookies I could eat this year and I did eat.  It just brings back so many memories to smell them and to taste them.  And all of the cookie trays we made had been made and given out before we made these.  So we had all those cookies to ourselves!  But my dad took about half the batch.  He too was also thrilled to have his mother's cookies at Christmas time.  They filled 2 ice cream buckets, that's about how many there were.

Christmas Card for Kids to Color

I wanted a card that Jayden could color for his teachers.  But in my quick search I couldn't find one.  So I quickly put these 3 together.  They say the same thing inside, but there are 3 different pictures.  I believe you should be able to right click on it and save it to your computer and print it.  If not, and you'd like one, send me your email address and I will email it to you.
These are cards to be folded in quarters, not half.  I did it that way because they fit inside of an invitation envelope nicely and I have those envelopes.


I'm also partial to the Nativity scene being on the Christmas card and those are most definitely hard to find.  Not that I don't like Santa's and snowmen, it's just... Jesus is the reason for the season.  However next year when Jayden is in public school I will make one with Santa or snowmen just not to offend anyone, but I will still write "Merry Christmas" and not "Happy Holidays."

Monday, December 20, 2010

Nativity Craft

In nursery the kids made this cute little Nativity craft.  (FYI- my mother in-law is the nursery leader and 2 of her grandkids are in her class, Tanner and Carolynn.)
This is what Tanner made and he just loves it!  He told me all about it and who the people were.  Then I hung it up and every time he'd see it he would tell  me he made it for me and all about the people in the picture.  And as I am writing this post he saw the picture and said "I made that for you momma!"

 Here is the back.  I'm sure granny wrote his actual name, but Tanner wrote the circle or the "o" as he calls it and the "T".  That's how he writes his name if you ask him to write it.  So far those are the only letters he can write and I don't even know who taught him how to write them.

Thursday, December 16, 2010

Christmas Ornaments

Here are 2 ornaments I made this year.
 I used our family picture from our Christmas card last year, I just love the picture.
 And I had Carolynn (my niece that I baby sit a couple days a week) dress up as Mary and gave her Jayden's baby doll to hold for baby Jesus.  And then I made this ornament for her.
Here are the pictures I printed for the ornaments...
 I created the background with some clip art of weathered wood, to try and make it look like the back of the stable.  And cut around the people and put it on top of the background I made.  I made the pictures 2.5"x3".
I spray painted Popsicle sticks that I cut in half to form the stable.  I think it would be neat if you turned the sticks the other direction to make if more 3D looking, but I was too lazy to paint the other side of the sticks.  I had the little wooden stars from another craft I did a few years ago.  And so I just painted them.  You could use foam and cut stars or whatever your little heart desires.
I printed the pictures on card stock, just to give it more stability.  And then I used spray adhesive to glue them to a cereal box, again just to  make it more sturdy.  Also if you do print them on regular paper, sometimes the spray adhesive goes through the paper and ruins the picture, but it doesn't go through card stock.  Then I mod podged over them twice, letting each coat dry for at least 20 minutes.  I did this because I printed it myself, the ink would smudge when glue touched it (when I attached the sticks) and it will help the picture to last longer.
I used regular Elmer's glue to attach the sticks.  I hot glued the star on and I put a piece of hemp underneath the star to hang it and to have a little extra hanging down.
I think they turned out pretty cute.  What do you think?

Monday, December 13, 2010

Stepping Stones For Granny

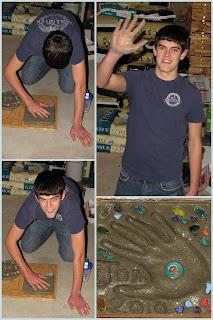
Polly had a great idea to make these hand print stepping stones for Granny and Pappy for Christmas.  They have such a beautiful flower bed around their entire house.  So we each bought a kit for our kids and for the grandchildren that don't live around here (Calvin, Caelin and Chase).  We got together at Polly's house to make them.  And Andrew visited Matt and brought back Calvin's.  Becky and Ralph went to visit Scott and his family for Christmas so they took the kits down with them to get their stone made.  The rest of us gave them a small album with these pictures and big box with all the stones in them on Christmas Eve.  (I'm posting this later, but I'm going to change the date to the date we got together at Polly's house.)
Dave mixed most of the stuff for all the stones.

Jayden

Tanner

Trevor

Austin

Carolynn

Corban

Damean

Finn

Josh

Rhett
I think they all turned out great!  Such a cute idea!

Sunday, December 5, 2010

Christmas Card 2010

Before church I took a few photos in front of the tree for our Christmas card this year.  I really liked last years picture where we all dressed up like the Nativity, but I didn't want to do the same thing this year.
Here are some of the pictures I like, but didn't use in the card.  (This first picture is similar to one in the card, but Jayden's eye's are to the side.)

 Tanner was so excited to wear his own tie.  I have a cute sweater vest that goes with this outfit but he wouldn't let me cover up his tie.
 This was the one and only family picture that I liked.  I had told Dave I just wanted pictures of the boys.  But I just couldn't resist getting a family photo.  I love looking back at all the family photos!


 Jayden was just so cute with the Santa hat!
And this is the 4x6 that I put together to mail with our cards this year.  I placed every little snow flake.  I wasn't sure if I wanted the "2010" where I have it or up in the corner of the family picture.  I didn't want it to stick out too much, so I decided to leave it where I had it.  I just felt it would really stand out in the corner of the family picture.
Each boy signed their own name on all of the cards this year.  I was afraid it would take too long if Jayden wrote his whole name and he might get bored and not sign them all.  So I had him just sign "JJ".  And for some reason Tanner is into writing "T" and "o".  So he signed a "T" for his name.  He does it so well and I have no idea where he learned it from.  It's kind of awful to say, but I wasn't the one who taught him to write a "T" and I don't know who did.
Here is the little letter I typed up and included in each card this year...

Dear (we wrote in their name)
          We had a great year in the Staus House in 2010.  In the beginning of the year we totally remodeled our kitchen and dining room.  Dave did most of the work himself (with help from wonderful family and friends) & he did a fabulous job!!!  We just love our new kitchen!
    In the March 2010 issue of the Family Fun magazine, Susan was published in the “My Great Idea” section for her idea of “Picture Perfect Game Pieces.” 
     Jayden is in his last year of preschool before he starts Kindergarten and he just loves going to preschool.
    Tanner continues to make us laugh each day and amazes us with how smart he is.  He cannot stop talking about when he finally gets to go preschool next year.
    And the most exciting news is that we are expecting our 3rd child around June 9, 2011!!!  Jayden really wants a sister (really 2 sisters) but we won’t know what it is until sometime end of January.  You can always check our blog to find out what it will be and to see what is happening in the Staus House.  Susan tries to post regularly to keep our friends and family up to date and to have all the happenings recorded for the family journal.
     We would like to wish you a very Merry Christmas and a Happy New Year!
                                           Love,
         David, Susan, Jayden, Tanner & Baby #3 Staus
www.DavidStausFamily.Blogspot.com

Please don't be offended if we didn't send you a card this year.  If we didn't and you'd like one, please send me your mailing address.
Merry Christmas Everyone!!!

Tuesday, November 23, 2010

Honey Roasted Almonds

I found this recipe for some honey roasted almonds and I tried it.  It was super easy and super yummy!
2 C whole almonds, skins on
1/4 C sugar
1/2 tsp. salt
2 TBL honey
2 TBL water
1tsp. almond or vegetable oil

Spread the almonds in a single layer in a shallow ungreased baking pan and place in a cold oven.  Bake at 350 degrees, stirring occasionally, until the internal color of nuts is tan (12-15 minutes).  Remove from oven and set aside.

Thoroughly mix the sugar and salt.  Stir together the honey, water and oil in a medium size pan and bring to a boil over medium heat.  Stir in the roasted almonds and continue to cook and stir until all the liquid has been absorbed by the nuts (about 5 minutes).  Immediately transfer to a medium bowl and sprinkle sugar mixture over all and toss.  Spread on  wax paper and cool.

(I mix the sugar and salt in a medium bowl and dump the nuts in it and the stir it up.)
I just love these and think they are so yummy!  I hope you enjoy them too!

Tuesday, October 26, 2010

Spider Pops

I saw these cute spider pops on familyfun.com and thought we'd make them for JJ's preschool class.  Jayden just loved them!


It went along nicely with Jayden's costume, since he was spider man.

Friday, October 8, 2010

Spiders

I took the kids to story time at the library and they read about spiders and then they made their own.  They were so cute!


Wednesday, October 6, 2010

They're Hung Up!

 I finally decided where to hang the things for my wall, the ones I made.  And Dave, my hero and hubby, hung them up for me!!
Thank you Dave!!!  I love seeing them on my wall!!!!!  He hung them with screws and made them harder to knock off.  I thought I'd use that 3M sticky stuff, but it made them stick out from the wall and I didn't like that.  So Dave came to my rescue and hung them up.  Aren't they beautiful!?!?

 I wanted to hang this on our brick above the part of the mantel that has all of our families, family pictures.  But I didn't want to put screws or nails in the brick and saw no other way.  The boys have knocked off and broken 2 of the frames I used to have above the couch and so I decided to put it above the couch and take down all those pictures.  And I love it!  And it's much harder to knock down then those pictures were.  
What do you think?


Saturday, October 2, 2010

Home Depot Kids Workshop

Dave took both boys to the workshop this time around and I went to snap a few pictures.  Taggart and his daddy also went at the same time as Dave.  This week they made fire boats and they also had a fire truck and an ambulance there for the kids to tour. 
The tables are too wobbly and hard for the kids to hammer on so they all worked on the ground.


 Tanner did so well with the hammer.  He just loved hammering.  But once it was built and time to put the stickers on, he just wondered off and started playing in the shopping carts.
Jayden and Taggart


Jayden, Tanner and Taggart

Related Posts Plugin for WordPress, Blogger...